
Tuesday, May 21, 2013
This Blog Has Moved
Hello everybody! I have recently moved my blog. If you would like to see new content from me head over to my new blog!
Wednesday, August 8, 2012
D.I.Y. Mod Podge
Okay, so pretty much everyone has seen the recipe for do it yourself mod podge. I just thought it would be a good idea to record my experience in making it. Mod podge company must be wanting to kill someone because people learned they didn't need to spent 20 bucks on glue. In fact, I bought two things of Elmer's glue for $1 at Wal-mart since it is getting close to back to school time.

Elmer's Glue
Container for mod podge
Yep, that's it!
For my container I plan on using an empty pickle jar. I don't really know how well it will hold up, but it seemed like a good use for it.
So all you do is fill your bottle up halfway with glue. Then halfway with water.

Shake, stir, do what you have to to mix it.
 And there you go! Mod podge everything! I even mod podged some fabric onto the jar and put some vinyl letters on it for a label. So you know it works great! I can't wait to get started on some awesome projects. Feel free to post links to your mod podge projects down below!


What you'll need:
WaterElmer's Glue
Container for mod podge
Yep, that's it!
For my container I plan on using an empty pickle jar. I don't really know how well it will hold up, but it seemed like a good use for it.
So all you do is fill your bottle up halfway with glue. Then halfway with water.

Shake, stir, do what you have to to mix it.

Wednesday, July 4, 2012
Spinach Mushroom Pizza

Servings:
8 per pizzaTotal Cook Time:
25 minutesIngredients:
• 12 inch ready made pizza crust• olive oil
• 1 cup baby spinach (about 1 ounce)
• 2 oz pizza sauce
• 8 oz mozzarella cheese
• 1 cup sliced mushrooms
Directions:
Step One: Pre-heat oven to 450 degrees.Step Two: Lightly coat pizza crust with olive oil and cook for five minutes.
Step Three: Remove crust from oven and spread a small amount of pizza sauce on crust.
Step Four: Lay out baby spinach leaves until the cover the crust. You can add more than one layers if you want more spinach per bite.
Step Five: Spread mozzarella cheese onto pizza.
Step Six: Place mushrooms onto pizza.
Step Seven: Cook 8-12 minutes, until cheese starts to brown and mushrooms darken. Slice and enjoy!
Review:
Sounds sort of disgusting right? Wrong! It's amazing! The spinach and mushrooms add not only great flavor and texture, but also a lot of nutrients. What is even better about this pizza is that it is meatless. Which in case you didn't know, is the new health rage my family and I are going trying out. Apparently, meat is super bad for you and is the main cause of a lot of America's health issues like obesity and heart issues. Another great thing about it was that it was so easy to make. All of the preparation was basically pulling the ingredients out of the package and putting them on the pizza. For all the time that it takes, and the great taste you get with it, I will definitely be cooking this recipe over and over.
Price: Inexpensive. The most costly thing about this recipe was the cheese and every ingredient was under three dollars. Definitely worth it.
Try It? Let me know what you think!

Monday, July 2, 2012
My Goals
There are several things I wanted to accomplish when I started this website.
Originally, I was looking around for organizing/crafting blogs, and couldn't find any that had everything I was looking for. So I thought that it was quite possible, that other people were having that problem as well.
I started it before I was actually moved out, with the idea that I was going to be a picture perfect housewife, and all I would have to do is take pictures of my wonderful life and post about it. But now that I realize that isn't even possible, I have some new goals around my house and I'd like to use this blog to help me stick to them.
Goals:
1. I want to make everything be used to the best of its potential.
I live in an itty bitty apartment. Like, if I showed you my kitchen you'd probably cry, I know I want to. So getting everything used to its potential is so important because I only have a limited amount of room for everything in my home.
This really involves me getting really creative, because unlike home-owners, I can't make any permanent changes to the apartment. I can't change the cabinets, add shelving, or do anything that would essentially make my life easier. It's all about the temporary for me. Which makes things a lot trickier and that much more necessary.
2. I want everything to look like a real home.
I'm only 21 years old, yet I have the life of a thirty year old: a baby, a husband, a home to take care of. I have a hard enough time getting taken seriously with all of these things going on for me, and I don't want a poorly kept home to validate people's judgements. I would much rather impress people by having a "homey" home, instead of "yeah, this looks like a 20 year old's apartment."
3. I want things to run as smoothly as possible.
With a baby, I have very limited time to do the things I wanna do. So when I do have time to clean or cook, I'd like it all to run smoothly so I can get it done quickly and have time to do the things I would enjoy, like more organizing, playing on the computer, or reading.
4. I want to start living a healthier lifestyle.
I have been very big on take-out in the past. And when I have cooked, I thought you always had to have a meat portion for protein. Recently I learned about how much healthier it is to live a vegetarian/vegan lifestyle. And I already knew it was much healthier to cook yourself as opposed to getting fast food. But I need a way to organize recipes we like and recipes we didn't like. I'm hoping this blog will help that.
Friday, June 22, 2012
Baby Talk (1) Things I Wish I Knew I Needed
I spent so much time trying to make sure I wouldn't be stuck at home with Emma (my one month old daughter) desperately wishing I would have bought something before so I could have it on hand. Naturally though, as I'm sure it goes with many first time mommas (especially younger ones like myself) no amount of preparation could make me know exactly what I'd use and what I wouldn't.
So I searched on the internet, hoping to find a post exactly like the one I'm writing. What I (as I knew mom) wish I had, or had more of, after having my little bundle of joy.
1. Receiving Blankets

For one of my baby showers, a friend bought me a 5-pack of receiving blankets, and a few other people got me some other types of regular blankets. I thought that I would never really have her wrapped up, and she'd only use them every once in a while because when I worked at a daycare, I never swaddled my babies, so I didn't think I'd swaddle my own.
Boy, was I wrong. Emma LOVES to be wrapped up nice and tight. As she is getting older she is growing out of it more, and doesn't need to be swaddled to sleep. But in those first few weeks it was the only thing that would make her really cozy.
Now, you may be asking yourself or saying, well just reuse the one you had used earlier, and 5-10 really would be all you need. And, in a case where babies aren't messy, this makes perfect sense. Unfortunately, babies are a big ball of mess. If she would spit up a little, you don't have time to run for something to wipe it up, especially if you just settled down into a comfortable position. You use the blanket. If they accidentally pee through their diapers, the blanket gets it too. Pretty much, you need at least twenty of these babies to not run out before laundry day.
2. A Bouncer Seat
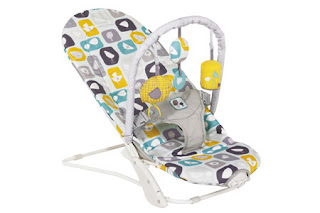
If you're like me you will at some point want to clean your house, or go to the bathroom, or take a shower, or make yourself a sandwich or do something in which you don't really want your baby in your arms. So you wait until she is dead asleep in her bassinet right? WRONG. You eventually will have to learn how to do things with her awake, because let's face it, they don't stay this way forever.
I absolutely hate putting her in her bassinet when she is awake. It is a fuzzy cream colored bassinet, and has absolutely nothing stimulating about it from her perspective. And in those moments when she is awake, I want her to be able to look around and visually explore, not stare at some cream colored fuzz while I'm doing the dishes. So if you have a bouncy chair, then you can sit her/him in it while you're doing something else and they can look at you, look around at the colors and shapes in the room or look at the toys that many of them come with.
I originally had a swing for this purpose, but it sits her upright and well... swings her, and I wanted something that would lay her flatter so she could stretch her muscles and wouldn't get her used to falling asleep with the swinging motion so she sleeps good in her bassinet.
3. A swiss army bassinet.

I originally just had a pack-and-play with an bassinet attachment that I was going to use as a bassinet. But luckily, the hubs Granny bought us an actual bassinet and I am in love with it.
It vibrates, plays music, and my favorite part: has wheels! I take Emma out into the living room when she gets fussy in the middle of the night, and instead of having to pick her up, hold her while I make a bottle or anything else, she can stay in her bassinet and be soothed by the vibrations and music until I'm ready to feed her. And then, after I'm done and she is starting to fall asleep, I can set her in her bassinet and if she fusses a little still, whoever is in the bedroom sleeping (whether it is my husband, or if he is taking a turn, me) doesn't have to have their sleep interrupted by a baby learning to go to sleep. We can sit in the living room where we take her to feed her until she is asleep and then roll her back into the bedroom for some more sleep.
So I searched on the internet, hoping to find a post exactly like the one I'm writing. What I (as I knew mom) wish I had, or had more of, after having my little bundle of joy.
1. Receiving Blankets
For one of my baby showers, a friend bought me a 5-pack of receiving blankets, and a few other people got me some other types of regular blankets. I thought that I would never really have her wrapped up, and she'd only use them every once in a while because when I worked at a daycare, I never swaddled my babies, so I didn't think I'd swaddle my own.
Boy, was I wrong. Emma LOVES to be wrapped up nice and tight. As she is getting older she is growing out of it more, and doesn't need to be swaddled to sleep. But in those first few weeks it was the only thing that would make her really cozy.
Now, you may be asking yourself or saying, well just reuse the one you had used earlier, and 5-10 really would be all you need. And, in a case where babies aren't messy, this makes perfect sense. Unfortunately, babies are a big ball of mess. If she would spit up a little, you don't have time to run for something to wipe it up, especially if you just settled down into a comfortable position. You use the blanket. If they accidentally pee through their diapers, the blanket gets it too. Pretty much, you need at least twenty of these babies to not run out before laundry day.
2. A Bouncer Seat

If you're like me you will at some point want to clean your house, or go to the bathroom, or take a shower, or make yourself a sandwich or do something in which you don't really want your baby in your arms. So you wait until she is dead asleep in her bassinet right? WRONG. You eventually will have to learn how to do things with her awake, because let's face it, they don't stay this way forever.
I absolutely hate putting her in her bassinet when she is awake. It is a fuzzy cream colored bassinet, and has absolutely nothing stimulating about it from her perspective. And in those moments when she is awake, I want her to be able to look around and visually explore, not stare at some cream colored fuzz while I'm doing the dishes. So if you have a bouncy chair, then you can sit her/him in it while you're doing something else and they can look at you, look around at the colors and shapes in the room or look at the toys that many of them come with.
I originally had a swing for this purpose, but it sits her upright and well... swings her, and I wanted something that would lay her flatter so she could stretch her muscles and wouldn't get her used to falling asleep with the swinging motion so she sleeps good in her bassinet.
3. A swiss army bassinet.
I originally just had a pack-and-play with an bassinet attachment that I was going to use as a bassinet. But luckily, the hubs Granny bought us an actual bassinet and I am in love with it.
It vibrates, plays music, and my favorite part: has wheels! I take Emma out into the living room when she gets fussy in the middle of the night, and instead of having to pick her up, hold her while I make a bottle or anything else, she can stay in her bassinet and be soothed by the vibrations and music until I'm ready to feed her. And then, after I'm done and she is starting to fall asleep, I can set her in her bassinet and if she fusses a little still, whoever is in the bedroom sleeping (whether it is my husband, or if he is taking a turn, me) doesn't have to have their sleep interrupted by a baby learning to go to sleep. We can sit in the living room where we take her to feed her until she is asleep and then roll her back into the bedroom for some more sleep.
What about you? Was there anything you wish you had before you had your first baby?
Tuesday, March 13, 2012
Getting Organized: To-Do Lists
Housework is boring. Cooking can be very boring. Grocery shopping can be boring. Unorganized crafting can be stressful. Pretty much everything that needs done on a regular basis, or something that takes more time than you have in one sitting, feels like a chore because you usually forget everything that needs to be done by the time you're ready to do it.
So what do you do in these situations?
I am obsessed with making lists. To me, it makes everything seem like so much more fun when I can cross it off my list when I have finished it. It is one of the reasons my house is clean, because I have a cleaning check list and I love marking things off as it's finished.
But one thing I hated about my to-do lists, is that I would always lose them. Or that I would get too many different lists in one place and not have an organized way of keeping them neat.

So when I found this on sale at Target the other day (only $3.98!) I jumped on the opportunity. It is completely awesome.
First of all it is a spiral notebook so it keeps all my lists together, and I can look back on old lists to see what I have accomplished in the past. I also never have to wonder where my list went off to, because it is always gonna be in this book. I love it!

Second of all, it has a great set up for organizing my lists. It has the cute little pink square at the top so I can write the title of the list. Then it has the huge section for the actual list which is awesome.

But it also has this nifty little sidebar which helps me categorize my list in larger groups if necessary! I love it!
Now when I'm brainstorming a new project, making a grocery list, checking for organizing efficiency, or writing my to-do list for the day, everything is at my finger tips allowing me to focus on what needs to get done.
How about you? How do you organize your lists? How do you remember what needs to be done?
Monday, March 5, 2012
D.I.Y. Decorated Lettering

And thank goodness I did because there was a heck of a deal going on! Little cardboard letters were 90% off! Now, most of them were already taken of course (as they were each going at $0.25 a piece) but there just so happened to almost be all of the letters I needed to make a sign that says read to go on my bookshelf.

What You Will Need For This Project:
• Letters to cover
• Fabric or scrapbook paper to cover them
• Some sort of adhesive, whether it is adhesive spray or scotch tape
• Scissors
• Pen/Pencil
• Measuring tape/Ruler
Now obviously I didn't want these letters as is, they were brown cardboard and most had a few rips from where the stickers wouldn't come off right. So I made a plan to cover them.
First I picked out the paper I intended on using. For Christmas last year, my mother got me these beautiful scented drawer liners, but seeing as that was two years ago, the scent is all out of them. And I loved the design on the paper, so I wanted to put it to good use where I would see it more often.

Second, I measured the width of the side of the letter, because I wanted to cover the sides as well so you couldn't see hardly any of the cardboard. Mine measured at 2.5 cm.

Third you have to trace your letter face down. Meaning, look at your letter, have it facing how it reads, take that face, and put it down on your paper so it is backwards when you look at it. This way, you're tracing it to cover the front.

After I was done tracing the letter, I took my measuring tape and made several lines all around the letter that were 2.5 cm away from the line I traced.

Your fifth step is to cut it out at the lines that you marked with your measuring tape. Do not cut at what you traced unless you don't want the sides covered, or you plan on adhering the sides separately.

Now you will need to cut the corners. When you do this it will make it much easier to fold over without having creasing sides. If you want to wait until after the next step to do this so you know the best places to cut it, that is perfectly fine.

For this step you will need some sort of adhesive. I wish I had some adhesive spray, but I haven't made a trip to hobby lobby lately, so I don't have any. If this were anything other than cardboard, I would have waited until I had something stronger, but I just used scotch tape to adhere the paper to the letters. I did the little fold over trick and put a few pieces on the front. This isn't going to be the main hold, so don't worry about how well it sticks at this point. You want to put them on the front face of your letter.

The eighth thing to do is place the letter face down onto where you traced it.

Now, begin folding your paper over the side and taping it.


Keep doing this until all the paper flaps are taped down and until your letter is complete!


Doesn't it look so fancy? And you can't tell it was once a cardboard mess. So repeat this with all your letters until you have a wonderful finished project. It really adds a lot of flair to a shelf or a wall when you have the 3-dimensional wording and art. And I made mine for $1.25! You can't tell me you wouldn't buy a word set for such a low price if you saw it!

Have you done any cool art projects recently? Are you planning on attempting this project? Let me know!
I linked this up with: Serendipity and Spice and A Bowl Full of Lemons.
Subscribe to:
Posts (Atom)